
I also teach 3D Animation. I completed this animation in one day, so it is not perfect but still kind of interesting
3D Printer build Animation Link
Same thing but this time has a narration of the steps involved in building the printer.
| Looking at the materials | .jpg) |
| Electronics and stepper motors | .jpg) |
| Lots of nuts and bolts | .jpg) |
| Trimming the 3D-Printed corner pieces | .jpg) |
| Fancy nuts which grab the supports. Sometimes they don't lock, so we would back them off a bit and then re-tighten them again. | .jpg) |
 |
.jpg) | |
| The base has two supports, the top only has one support. | .jpg) |
 |
.jpg) | |
.jpg) | |
| I wasn't going to hold the support while my kid hit it with a rubber mallet, so Rob helped | .jpg) |
| Jason another very brave Maker | .jpg) |
| Careful that the support goes in straight, it can dig away at the plastic if it is not aligned properly | .jpg) |
| This was a bit tricky, we did not remove a tab of plastic so we used an allen wrench to push the lock nuts inside the support. | .jpg) |
 |
| The fancy expensive rails, hold them horizontal or the sliding part may fall off, not sure how to reattach the slider if it falls off, so we were very careful | .jpg) |
| Building the top support | .jpg) |
 |
| Basic frame complete. That was the first day so about 2.5 hours | .jpg) |
 |
| Next the stepper motors but the bolts had very little room to tighten so I cut off this allen wrench. I think David has redesigned the base so that a hole is available to allow easier access with a wrench. | .jpg) |
 |
.jpg) | |
.jpg) | |
| The stepper motors have to all be aligned so that the connector is facing the same relative direction | .jpg) |
| Now the carbon rods. These things feel expensive. We made ours about 27 cm or 10.6 inches. What was important is that they were all exactly the same length. Luckily they sanded really easily | .jpg) |
 |
| Carbon rod ends. We mistakenly put the swivel parts in too early | .jpg) |
 |
.jpg) | |
| Cool contraption Rob 3D printed to help make all the carbon rods with ends exactly the same length. | .jpg) |
| Mix the five minute epoxy and let it set overnight. A very long five minutes. | .jpg) |
 |
| The rails have a light oil covering so we cleaned them with paper towel. | .jpg) |
| Lower stop for the rail to rest on | .jpg) |
| Top stopper, put all three of these at the exact same spot about 1 mm from the top. Note at the bottom of the image the slider and the bottom stop | .jpg) |
| We only used every second hole for a bolt and cool rail nut. I rthink this was the end of the next day so we are presently at about 6 hors build time. | .jpg) |
| Top pulley from outside in | .jpg) |
 |
.jpg) | |
| So far fairly easy | .jpg) |
| OK, this got difficult, needs three washers and a nut, very small, not much room, eventually put 2 washer the nut and then slid the third washer in place, took a while to do, my fat fingers and bad eyes were no help, good time to have a teenager around | .jpg) |
| Was helpful to lay the printer on its side. Finally that was done. | .jpg) |
| So this is how the printer screen will look when it is running. We only have one E3D Hotend but it looks like you could have three. | .jpg) |
| Here is a picture of all the electronics still in their bags. Strangely the electronics was fairly straight forward. | .jpg) |
| Let's do the stepper motor belt before the electronics. This cool bit of 3d printed plastic holds the belt fairly well | .jpg) |
| It gets attached to the slider on the rail | .jpg) |
 |
.jpg) | |
| Now the belts. Get them sort of tight , loop it around and it holds. | .jpg) |
 |
| Belt tightener worried me that we would cut the belt, but with a quick flick the tightener went on fine. | .jpg) |
 |
| This shows at the bottom the tightener, but also a bit of plastic pushed in because the belts were slipping. The plastic is wedge in between the plastic and the belt. | .jpg) |
| A small tray for the electronics two holes for bolts onto the supports | .jpg) |
| Then the Arduino Mega, four screws screw into the 3d printed tray | .jpg) |
| The stepper motor driver just pushes on top, make sure it is properly aligned with the Arduino, fairly obvious | .jpg) |
 |
| Click on this main diagram to show it larger. Every one of these connections must be perfect. Good time to let teenage eyes check these, or get a good magnifying glass. | 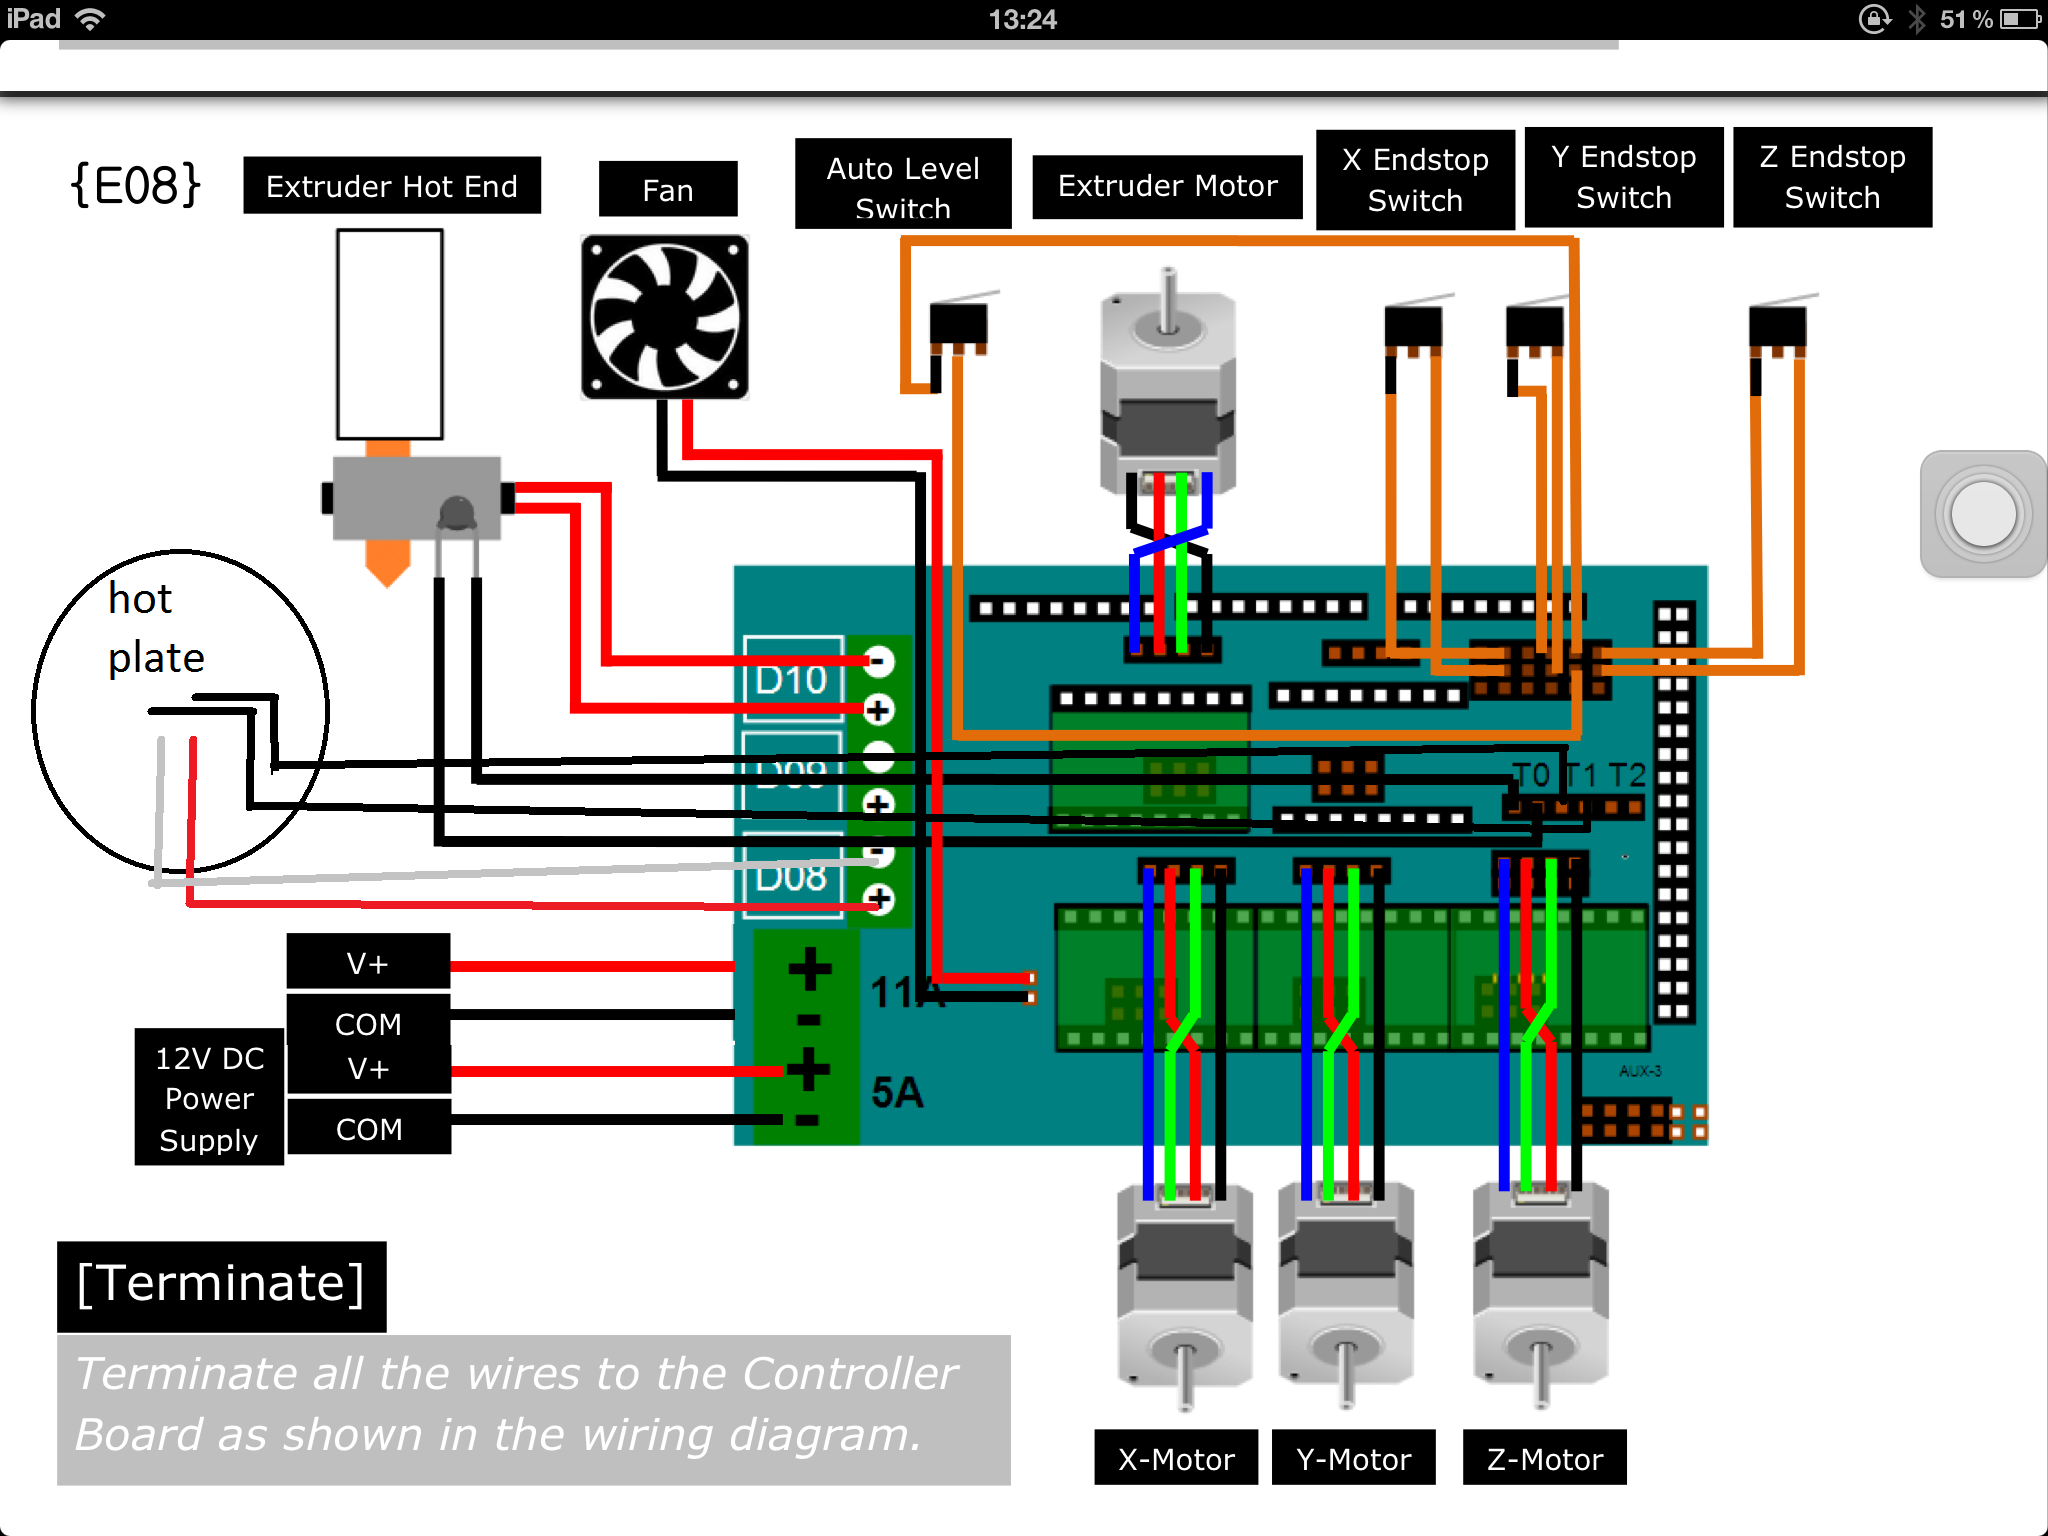 |
.jpg) | |
| One of the four stepper drivers that needs a heat sink taped to it. | .jpg) |
 |
.jpg) | |
.jpg) | |
| I worked on the stepper motor connectors, my kid did not enjoy doing this | .jpg) |
| Note the crimping tool, this was irritating work | .jpg) |
| Now is a better time to put the swivel joints on the carbon rods. If you look at the swivels carefully one side is easier to squish in than the other way. | .jpg) |
| Three of the four stepper motor drivers attached. This is the end of the third day which gives us about 9 hours into this build. | .jpg) |
| End stops for the rails, we need three of these | .jpg) |
| But only one of these. This is the end stop for the E3D Hotend | .jpg) |
| What things look like so far. It looks like I did not take a picture of putting the rods on and the base for the E3D Hotend | .jpg) |
 |
.jpg) | |
.jpg) | |
.jpg) | |
.jpg) | |
.jpg) | |
.jpg) | |
| Only 2 sets of items need to be soldered, the 4 end stops and the hotplate. | .jpg) |
 |
| More connectors, never really got good at doing this. | .jpg) |
| Turned the printer upside down to thread the middle hole for the E3D Hotend | .jpg) |
 |
.jpg) | |
| This holds the E3D Hotend to its base | .jpg) |
| These spacers hold the endstops | .jpg) |
| Putting on the endstops | .jpg) |
| This is what David's 3D printer looks like, we are getting close | .jpg) |
| End stop wires hanging down. They get connected to the supports | .jpg) |
| Close up of where the stepper motor connectors go. Good idea to label the stepper motors x, y, z so you can get them in the correct spots. End of the 4tyh day, 12 hours complete | .jpg) |
| Last bit of soldering, the hot plate, wires to surface mounts. Not really happy about this. Very easy for this to be ripped off the surface mount. Taped it with heat resistant tape. | .jpg) |
 |
| Temperature sensor connected. Make sure the wires are protected from a short circuit | .jpg) |
| Red and black wires which need to be long enough to reach the arduino. The blue painters tape will eventually be changed to heat resistant tape. | .jpg) |
| The stepper motor base for the extruder | .jpg) |
| Lots of scrapping to get plastic out of the way. | .jpg) |
| These blue hotplate holders were too tight. | .jpg) |
| I tried to drill them and melt them but it just became a mess, So David 3d Printed a better set. | .jpg) |
 |
| The back of the monitor | .jpg) |
| The front of the monitor incorrectly mounted to the back part. David spotted the mistake. (Really important to have someone who knows what they are doing.) | .jpg) |
| Did not really fit well, eventually attached the monitor to the front plate and then attached the back and it fit snug. | .jpg) |
| This little piece is needed for the endstop on the E3D Hotend | .jpg) |
| This allen wrench is a part of the 3d printer | .jpg) |
 |
| Yes that's a safety pin, holding up the Allen wrench will be the spring from a fountain pen. | .jpg) |
| Maybe stayed at the FVmakers a bit to long. The kid can stay up to 2am playing video games but exhausted after 3 hours of making. That's it for the 5th day, we are now at 15 hours. | .jpg) |
| Shows the three endstop connectors correctly placed | .jpg) |
| The monitor ribbons were a tight fit to get onto the board and threaded under the support beams | .jpg) |
 |
| Random shot of the extruder stepper motor | .jpg) |
 |
| The power supply. On the right is the connector from the outlet. On the left are both sets of red and black wires to the Arduino | .jpg) |
| A few pictures of the E3D Hotend | .jpg) |
 |
.jpg) | |
| Trying to make all the wires look a bit tidier. Remember that the E3D Hotend needs to be able to go to the very top and the very lowest points, so all of the wires have to be long enough but not too long. | .jpg) |
| More crimping | .jpg) |
| Shows the final stepper motor for the extruder attached | .jpg) |
 |
| This whole E3D Hotend endstop was cool but hard to make. The allen wrench needs to push the button down and then be able to come off the button as the E3D Hotend gets to the hotplate. | .jpg) |
| We checked that the fan was blowing the correct direction, which it wasn't, the airflow must be blowing through the E3D Hotend, mine was sucking the air through. So we unscrewed it and flipped it around. | .jpg) |
| Power supply. I got mine from Amazon $24.96 USD http://www.amazon.com/Switching-Power-Supply-Strip-Light/dp/B007MWNF5Q | .jpg) |
| Shows the cables from the E3D Hotend, hot plate and two sets of wires from the power supply | .jpg) |
| Fire up arduino, flash the code supplied by David, load Repetier software and click home, and the endstops worked. Couple of stepper motors were not holding very well. A little screw on the stepper motor drivers tightened that up. (Tuerned the screw 1/4 turn clockwise until the stepper motor did not move easily by hand.) Then one stepper failed to work. Looks like my crimping was not done well, found a wire that was very loose. Re-crimped and things worked fine. | .jpg) |
 |
| Shows some of the code that is flashed to the Arduino | .jpg) |
| Now a tone of adjustments, will update this as I learn how to do it. Most things seem to work. The hotplate temperature sensor works. The steppers work, need to test everything. And that makes 6 days or 18 hours to get to this point. Still haven't printed anything but I need to spend some time learning how to setup the software. | .jpg) |